
Introduction
When you upload media files to your courses, it is worthwhile to optimize the media files to perform optimally on the devices that students will use. Be aware that VR headsets and tablets have a “mobile” CPU and GPU and therefore do not have the same processing power as a mid-range gaming PC. So, an uncompressed 4K video at 60 frames per second may run nicely on your PC, but it’s challenging the limits of the hardware of, for example, an Oculus Go.
Spending a little time preparing the media before you upload the file is a win-win scenario to make sure the course will run great on the intended devices and students don’t have to download unnecessary large courses over their Wi-Fi at home.
Quality versus file size versus performance
There are three factors at play when it comes to optimizing your media files:
- Quality: the visual fidelity of how well your media looks
- File size: the space the media uses in the cache and video memory of the device and internet bandwidth
- Performance: higher visual fidelity implies higher performance requirements.
Obviously the higher quality the better. Yet, take JPG compression for example: A ‘very high quality’ JPG will have less compression and less visual artefacts and will look great. Just like the original photo. However its file size is substantially bigger than a ‘high quality’ JPG. With a large 4K image, this file size difference between different levels of compression can be a matter of MBs while the visual quality difference is hardly noticeable.
Having very large files is not ideal. Why? First, the device has to store all this data locally so it will consume storage. Second, and perhaps even more important, all media files need to be downloaded. Headsets are usually connected to a Wi-Fi so, downloading a JPG that is 4MB but could have been 1MB is a very noticeable difference. Especially when a course consists of many JPGs (not even mentioning videos now).
High quality media is also challenging for the hardware. It depends a bit on the device, but mobile devices generally aren’t exactly powerhouses for high quality graphics. An Oculus Go will struggle to show a 4K 360 Image (as spherical environment) upon which a Video Scene Element is shown that is a 4K video at 60 frames per second. Especially considering here that a Video Scene Element is not shown full-screen, probably a 1K video at 25 frames per second would have already sufficed there.
In short, picture yourself a Venn diagram of the above three factors. The sweet spot is where all three factors overlap. To find this sweet spot is, for a large part, a matter of tweaking your media files yourself and see what works. However there are some general pinpoints for do’s and don’ts regarding media optimization that we shall elaborate in this article.
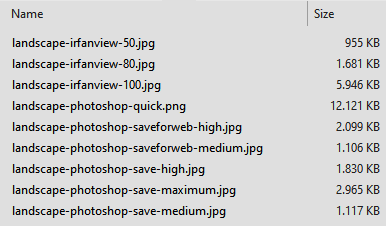
For example, here is the same 4K landscape photo saved with several compression settings. Notice the differences in file size among different settings. Also, notice how PNG yields a very large file in comparison to the JPGs
360 Images
- 360 Images need to be equirectangular projection. That means the dimensions are a 2:1 pixel ratio.
- For high-fidelity, crisp visuals 4K* images (so 4096×2048) are recommended.
- Don’t really go smaller than 1K* (so 1024×512). Basically 360 images with too small resolution results in rather blurry / upscaled looking graphics.
- When saving as JPG. If you are not so familiar with compression levels. Use Photoshop’s ‘Maximum’ or ‘High’ presets to optimize the file size. If you do not have Photoshop, you can try Irfanview, it is free, and save the JPG with 80 or 90 quality. Try both and check if you see noticeable compression on the lower quality image, if not, use it.
- We do not recommend saving as PNG. In common use, the file size is usually a factor 5 bigger than the same image stored in JPG without significant visual quality difference. However if your 360 image contains text or sharp lines / line art, JPG might introduce some artefacts / aliasing around text or sharp lines. If this is too noticeable and looking bad even at 100% JPG quality, it is better to use PNG for this scenario.
360 Videos
- 360 Videos need to be equirectangular projection. That means the dimensions are a 2:1 pixel ratio.
- For high-fidelity, crisp visuals 4K* videos (so 4096×2048) are recommended.
- Don’t really go smaller than 1K* (so 1024×512). Basically 360 videos with too small resolution results in rather blurry / upscaled looking graphics.
- The video framerate depends a bit on the targeted devices that your students shall use. 60fps is fine for most devices, however if you target low-spec tablets, you may want to stick to 30fps to avoid potential performance drops during video playback (depending also on other interactive elements playing simultaneously).
- We support MP4. MP4 however is a container format, not a codec in itself so you still have to pick the right codecs for both video and audio.
- We recommend to use HEVC (aka H.265) for video. If you however want to use H.264 please use the ‘baseline’ profile.
- We recommend to use MP3 or AAC for embedded audio.
- Additionally, unless it’s music, whispering or ambient sounds or anything that deliberately has (parts with) low volume. If you want to have good clear sound with consistent volume levels between videos, please normalize the audio before saving it.
Video Scene Elements
- Video Scene Elements do NOT need to be equirectangular. As they are shown as regular videos on a panel. They can be any resolution (max 1K).
- The max resolution for Video Scene Elements is 1920×1080.
- The video framerate depends a bit on the targeted devices that your students shall use. 60fps is fine for most devices, however if you target low-spec tablets, you may want to stick to 30fps to avoid potential performance drops during video playback (depending also on other interactive elements playing simultaneously).
- We support MP4. MP4 however is a container format, not a codec in itself so you still have to pick the right codecs for both video and audio.
- We recommend to use HEVC (aka H.265) for video. If you however want to use H.264 please use the ‘baseline’ profile.
- We recommend to use MP3 or AAC for embedded audio.
- Additionally, unless it’s music, whispering or ambient sounds or anything that deliberately has (parts with) low volume. If you want to have good clear sound with consistent volume levels between videos, please normalize the audio before saving it.
Audio Scene Elements
- We recommend to use MP3 for audio.
- Additionally, unless it’s music, whispering or ambient sounds or anything that deliberately has (parts with) low volume. If you want to have good clear sound with consistent volume levels between Audio Scene Elements, please normalize the audio before saving it.
Scene Element Icons
- Custom icons for scene elements need to be squared in their resolution. That it’s it’s a 1:1 pixel ratio.
- For high-fidelity, crisp Scene Element Icons we recommend to save them at 256×256.
- Don’t really go smaller than that as a too small resolution results in rather blurry / upscaled looking graphics.
- For icons it is OK to use PNG as JPG might introduce some artefacts/aliasing around text or sharp lines. However JPG might be OK too with illustrations or photos, so try both formats to see if JPG is sufficient. When saving as JPG. If you are not so familiar with compression levels. Use Photoshop’s ‘Maximum’ or ‘High’ presets to optimize the file size. If you do not have Photoshop, you can try Irfanview, it is free, and save the JPG with 80 or 90 quality. Try both and check if you see noticeable compression on the lower quality image, if not, use it.
*) Note: 4K resolutions in equirectangular projection are not comparable to the commonly used 1K/2K/4K resolutions for e.g. monitors or TVs. Equirectangular projection requires a 2:1 ratio, therefore 4K here means 4096×2048 pixels and not the 3840×2160 (16:9) commonly seen as resolution of 4K monitors or TVs.
